Plumbing for a Pedestal Sink


When you install a pedestal Lavatory, the plumbing is exposed, so you should make it look clean and presentable. The copper stub out should be cut off at one inch. This will accommodate a standard escutcheon trim ring and the valve will seat perfectly on the pipe and tight against the escutcheon trim ring. No copper pipe will show between the valve and the escutcheon trim ring.

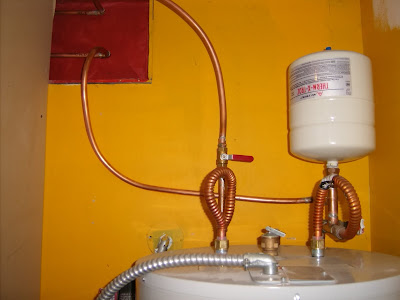
 My friend Bob, who is a master plumber, taught me to use tri-flow spray lubricant, when installing valves. You spray it on the pipe, ferrule and inside the valve before tightening. Tri-flow keeps the valve from leaking and you don't have to over-tighten the nut, which causes the ferrule to cut deeply into the copper pipe. WD-40 works also, but not nearly as well as Tri-flow, which contains silicone and helps to create a good seal. I also use quarter turn ball valves, they do not restrict the flow of water, like a gate style shut off and they are so much faster to turn on and off. They cost just a little bit more, but are well worth the difference in price.

The waste line uses a short sanitary tee in the wall and the trap adapter is glued tight to the fitting. The wall is framed with two by fours, so the adapter sticks out a little too far to cover with one escutcheon trim ring, so I had to use two (see in the photo above) . The back one is still missing screws in the picture, I just have to locate a couple of chrome plated bugle head screws to fill in the holes and it will be complete.

Installing a Kitchen Slate Floor


Slate makes a very rich and beautiful floor, but there are some things that need to be taken into consideration before you proceed. Slate is a stone and is split, so there is a lot of variation in its' thickness. Some slate is split on both faces, while other slate is called 'gauged'. That means the back side has been ground or surfaced to make it more uniform in thickness. Gauged slate still can vary from 1/4" to 5/8" thick in the same box. To get around this difference, you need to plan on using a lot of thin set mortar over your backing material.

Whether you use Hardibacker, Wonderboard or a Mortar bed, you start with a flat surface and are laying an uneven material. It is a lot less work if you start with your thickest slates and work away from there. Most slate tiles will have high and low areas in each tile and you just have to split the difference to insure that one part of the tile does not stick up and stub a barefoot toe in the middle of the night.

A floor is a lot more interesting if you lay it diagonally, especially if your kitchen is long like mine is. Tiles laid in a straight pattern make a long kitchen look like a hallway. Diagonally laid slate requires a lot more cutting and a little more material, but is definitely worth the extra work.

Daniel, laid out all of the slate, by pattern and color and did an excellent job, to make sure that there were no runs of similar colored tile; that would make the floor boring. I put in a small section of floor, when he was away and he sure let me know how ugly my part of the floor turned out. "Boring!!" too much of the same color, fortunately for me the dining room table covers that part of the floor.

I put dark green Granite counter tops in, but do not like the way Granite slabs look when used as a back splash. I thought the slate would be much more interesting, and I think it is. I cut the 12"x12" floor tiles into 6"x6" back splash tiles, and laid them diagonally.I love the way they came out and it was at a fraction of the price that granite slabs would have been.

All of the slate in the pictures was purchased at Lowe's. They had a closeout on some multicolored slate and I offered them $1.00 each if I would take all they had including the broken ones, and they accepted. This floor is the result and what a bargain it was.

After the slate is laid, it must be cleaned up and pre-sealed before grouting. It really helps to be careful to keep the thinset mortar off of the surface while working. This is where a damp rag and a bucket of water come in handy while laying the slate. I used a masonry sealer that is sold in the paint department at Home Depot. It is the same sealer I used after grouting. It goes on white and turns clear when it dries. This sealer is very inexpensive and durable. The finish is absolutely awesome in my opinion and costs a fraction of most of the sealers sold in the tile department or in tile stores. After grouting the slate, I put on two more coats of sealer, It is so beautiful it takes my breath away - just like my wife.

Isolate Your New Plumbing Project


Are you remodeling your kitchen or bathroom or adding on to your house. It is always a good idea to isolate new plumbing, by adding valves. It is much easier to shut off a zone, than shutoff the whole house. Ball Valves are very effective and inexpensive for this task. It is a lot easier to shut down a part of the house, so that life can go on, while you work.

Plumbing Noise Tips


There is nothing worse than finishing a plumbing project and listening to the pipes, creak and groan or hammer in the walls when you shut off the valve. It just takes a little bit of care to insure this doesn't happen to your project. I always use expanding foam liberally at all penetrations through plates, walls and through studs. It is also simple to strap pipes well, before the drywall goes on. Plumbing noise is a lot harder to fix retroactively.

Flat Roof Solution


I finished the underside of my car port with clear 1/2"x4" cedar. I want to keep it looking nice so I chose EPDM rubber as the waterproofing material above. After nailing down T&G Sturdi-floor plywood, I rolled out the sheet of rubber. It is 60 mil. thick and was quite heavy. After positioning the rubber, I rolled 1/2 of it back and troweled down glue on the plywood. After the glue was all down, I rolled the rubber back and then did the same thing on the other half. I jumped around on it to fine tune the position and then used a roller on the rubber to remove air bubbles.

The rubber is tough enough to take a good deal of traffic, but we try not to sit on chairs or drop heavy objects on it. If one of us does punch a hole in it, a regular inner tube patch kit is all you need to make a repair. Eventually I will build a floating deck and complete the railing to match the house entry. Thats' a job to tackle in the spring. It's getting close to the end of our summer weather, and I am out of money (hopefully temporarily) to take on a project of this size.

The first EPDM roof I put down was about 20 years ago in Sacramento, CA. on my parents flat porch. I inspected it recently and the extreme heat had shrunk the black rubber so that it was tight as a drum. White rubber was not available 20 years ago, and this was a relatively new roofing material. The rubber is still in great condition, but I would use white rubber in a hot locale, to prevent shrinking and also to reflect heat away from the structure. I am going to have to go back to California and pull the rubber up and reset it, or it will probably pull away from the walls and leak.

EPDM rubber has a reported 40-50 year rated lifespan, and after 20 years the rubber still felt as pliable and elastic as when I put it down, so I don't doubt that it could last that long. It would probably last indefinitely as a membrane under a Sedum or Sod roof. Maybe I will do that on my shop - Hmmm? that gets the wheels turning. I guess that is why I am a Perpetual Remodeler, I'm always thinking of something new to start on. The roof is getting old out there.

Hiding the Propane Tanks


We don't have natural gas piped into our property, so we have Propane tanks.
These tanks are not the most beautiful things to see, so I built an enclosure that is attractive and unobtrusive and will blend in with the new shingle siding and the landscaping. I used a couple of pre-made fence panels that I bought from Lowe's. The were cost effective and saved loads of time. One of the panels was used full size and the other one was cut in half and reworked a little so one half served as a gate and the other one is an end panel.
The nice thing about the pre-made panels, is they fit in great with the Mission style architecture.

Details of the Gable End Pop-Out

I cut the wedges for the popout using this make-shift
jig on the table saw.  I would place a 24" long piece of
2" x 6" against the jig and push it through the tablesaw.
It would make two wedges from each piece.
Adding a shadow and an angled pop-out on the Gable end was pretty simple, but a lot of extra work. I started with 2ft. long 2"x6"s and cut them out diagonally on the table saw. I built a simple jig for this to make them all uniform and expedite cutting out so many wedge shaped pieces. I ran a string across the bottom chord of the truss to help align the wedges, then just nailed them on and sheathed the whole thing with 1/2" OSB.

This is a view of the truss from the attic.
You can see the wedges attached to the
vertical chords of the truss to form a
6" popout shadow under the Gable.
This made a 6" shadow and really sets the Gable end off from the rest of the house. The hardest part about adding the angle was getting the shingles to push back into the transition area where the wall goes from vertical to angled. It does create an attractive curve in the shingles, but the shingles kept trying to wander as I would push them back and try to keep the butt ends aligned and on course, while stapling at the same time. People really should have three or four arms and hands, it would be very helpful for these types of tasks.

Under the pop out I filled the 6" shadow area with rough cut cedar 1X and a 4"x4" that was rabbited out to accommodate the wall shingles.


Hi, Sorry about the long delay in new postings.
I have been down in California, working on my parents home. It was supposed to be a simple job of getting the house ready to paint. You know scrape loose paint, caulk windows & doors, etc. Well the built in gutters were leaking - the solder joints were breaking apart from expansion and contraction, so that was a couple of days work to repair and waterproof.
Then I found termites - that took some demolition, rebuilding and stucco patching to match. I called the painter to let him know there was a hitch in the schedule and the fumigators came next to make sure we got all of the termites. There was evidence (termite poop) of further infestation. I found more work that needs to be done and will require another two week trip, before the painter can get on with his job. Such is the life of a Perpetual Remodeler.

I returned to Washington and finished shingling the front of the house. The gable end was going to look like one giant expanse of shingles, so I decided to add some interest.
I took a bunch of 2 ft. long pieces of 2"x6" and cut them diagonally to make long right triangles. I nailed these to the truss chords and then sheathed the gable end to provide a pop-out and create a nice visual break. I am very happy with the results. It was a bunch of work to try and bend the shingles, without breaking them. I wasn't prepared to build a steamer and try to soften the shingles, so I just pushed really hard and used a lot of extra staples. That's really loads of fun standing on top of an extension ladder. Lots of trips up and down the ladder, it is finally finished.
The whole family loves the finished result. We sat out in front of the house the last two nights and just stared at it as the sun set and cast a warm glow across our freshly shingled home.

Shingle Siding Finally Started


The house is starting to look more like a craftsman/mission style home and less like a mobile home now that the shingle siding is started. I started with a non-incised pressure treated 2"x8" at the base as a water table ledger and added a 2"x4" sill to the water table. I ripped a 12 degree bevel on the front and back, so that it will shed rain water. The shingles are laid in three five inch exposure courses, then one three inch course to add interest and break the pattern. The windows are trimmed with non-incised pressure treated 2"x4"s. The sill is also beveled 12 degrees and has an apron underneath. I rabbited out a 3/4 inch x 1 1/4 inch space for the shingles to fit into, leaving a clean finish. The short shingles that go into this space are nailed in with galvanized brads, so that the nail heads won't show. For a neat detail on the window frames I cut in square pegs to carry out the mission theme. The pegs were ripped to 1/2" x 1/2" out of some old South American Cherry flooring that I had in the shop. It is not a true Cherry wood, but more similar to Mahogany, so it should hold up to the weather well. There is already felt on the house, so I am only adding felt where it is missing and around windows for additional weather protection. The window trim receives a small copper flashing over the top as an additional precaution. The copper comes from scraps that I have salvaged over the years and held onto.

Dipping the Shingles


We started dipping the shingles and have completed enough to cover a couple of hundred square feet. It goes pretty fast. Daniel and I work as a team. He dips anywhere from five to fifteen shingles at a time, and lets them drain for a little while. He then hands them to me and I stand them up in the rack to let them finish draining. The rack is inclined toward a bucket that catches the excess. We let the dipped shingles sit overnight, then we stack the shingles and they are ready to go. We are using Chevron shingle oil, because it penetrates and offers lasting protection from insects and preserves the color. Dipping the shingles is time consuming and labor intensive, but offers superior protection to spraying them after installation. I am very happy with the finished result.

Go Sunday - Volunteers Needed for Foster Family

On Sunday, September 6, 2009 we will be building a barn for a foster family home in Tacoma. They need a place to store hay for a horse that was donated to help in the therapy of a little girl. I need volunteers with carpentry, labor, painting, and roofing skills. The barn will be 12' x 18'. That is the maximum we can build without a permit. I am the site leader on this volunteer project so email me at parksconstruction@gmail.com if you want to help with labor or materials. This barn will be a great blessing for a family that takes in children with huge needs. It will be a fun project that we will complete in one day.

Inexpensive Outdoor Structure


We always need an outside area that is protected from the weather, just to sit and enjoy the outdoors or to entertain. Until recently we did not have a dining room table and ate outside - Rain or Shine, Hot or Cold. The outdoor structure we bought at Target, had definitely outlived its original purpose and it was time for a more permanent structure. My friend Sean gave me some clear polycarbonate panels, that were left over from a job of his. The length pre-determined the size of the structure I would build. I went to Home Depot and bought some 4" x 4"s and 4" x 6"s and cut them all on my sliding compound miter saw. I built the trusses on the ground and gave them a light sanding. By the end of the day the structure was standing, completed except for the the polycarbonate. The roofing was completed with lights and I went to bed tired and satisfied. The following morning Sheila and I ate our breakfast under the protection of our new structure. I need to give it a light sanding and apply a couple coats of finish. I may remove the roofing for this job and re-install it afterwards. It will be difficult to finish around it and the purlins would weather better if the finish was on all four sides.

Buying Tools on Craigslist


Daniel and I went to Olalla, just north of us to purchase a concrete mixer we saw advertised on Craigslist. I often find great deals on tools and materials there. When we arrived at our destination, Wow! What a surprise! It looked like we were driving into a Disney theme park. The owner, Yvonne had used the mixer to make a patio in back and was finished with her projects. I said it looked like a great place to have a wedding or bed and breakfast. She told me that is exactly what she plans on doing in the near future. You never know what you will see or who you will meet - Life is really a fun adventure.

The New Siding is Getting Closer to Reality


I'm very excited. Some of the Mobile home look is coming off and going into the recycle pile, in preparation for the new shingle siding. I think I will put the shingles up in three courses of five inch exposure and one course of three inch exposure. That will make a nice look with the shorter course adding an accent and breaking up the large expanse of wall. I am so happy I found A&A Shingles in Forks, WA. - Mike Allen's prices are a third of the cost of buying shingles at the Building Centers.

Awesome Lumber Deal


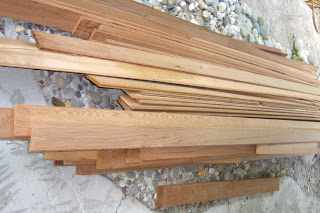
The new fossil bed/parking pad is part of an overall remodeling project - "The Car Port" The ceiling above is an in-progress job. I framed it using 2" x 8" joists and decked it with 3/4" OSB T&G Sturdi-floor. On top of that I glued down a EPDM 40 mil. rubber sheet, that is impervious to the elements. The ceiling is clear cedar T&G that I purchased from Lyle Schindler in Tacoma. He is the owner of Schindler Woods, and his prices are nothing less than spectacular, compared to the lumber yards. I purchased all of this T&G in a package deal, fifteen cents a foot if I would take the whole bundle, and accept the waste along with the good. There was between 15-20% of the material that was waste, but the price was only 20% of retail. That works out to a cost savings of 60-70% over lumber yard prices. Lyle is great to work with, and has an extensive background in finish carpentry. He carries many wood products that are difficult to find elsewhere. I also purchased some vertical grain, shiplap paneling that will be featured in a future blog on Craftsman style Interior Trim.

Shortcut and Handy Tip


Cutting out Windows and Doors in sheathing is always a chore. If you precut them before nailing on the sheathing, they often need to be trimmed or don't fit properly. I always carry a router with a straight bit for this job. If you look at the bit it has a spiral cutter, to help the cutter stay on course and follow the lumber. It also has a double bearing, which I often spray with Tri-flow or WD40, since they tend to heat up and stop spinning over time. The bit pictured is made by Ocemco. Amana and Velepec also make a straight bit with double bearings. The cut is always perfect and easy to make, except for the sawdust that sprays all over me. Do not try this with a 1/4" shank router bit, use only a 1/2" shank bit. The smaller bits will bend under this type of pressure. I use my old Porter Cable 1 1/2 h.p. router for this job. I own a couple of 3 h.p. routers, but they are just too cumbersome, and the 1 1/2 h.p. works just fine, as long as it is not pushed too hard. Next time you have a window or door cut out, try this technique. You will be pleased with the clean result. Make sure there are no nails or nail heads sticking out for the router to hit. It will shoot shrapnel all over and ruin an expensive router bit.

Logging Two Tall Trees


Earlier this year Vincent Frey, owner of Black Diamond Tree Service came over from Spokane and cut down a couple of large,tall dangerous Fir trees. These trees were big enough to crush our house in a bad storm and were in the wrong place for any of us to have peace of mind during the big winter storms we have in Puget Sound.
It was a thrilling day watching Vincent climb, limb and top these giants. The coolest part was his skill in cutting logs right off of the stump, and expertly landing them without damaging the logs or the driveway below. These logs are destined to be peeled and built into a gazebo this summer. It is really fun to think about using the logs for something more productive than firewood. Daniel stayed home from school the day Vincent came to take the trees down. It was an awesome educational opportunity to watch a master arborist at work. I was busy on the ground with rigging and pulling limbs out of the way, while Daniel took pictures and had the time of his life.

Mission/Craftsman Style Entry


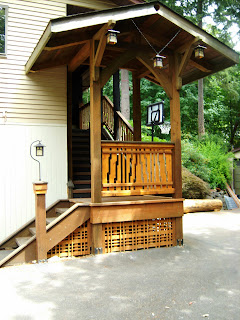
The old entry looked like an old fishing pier, complete with pier poles and rot. It was time to revamp the entry in anticipation of our new shingle siding. Budget is always an issue, so I decided not to hide the pressure treated lumber, but instead feature it. The 6"x6" posts and timber framing have the incise marks right out there where everyone can see them. I don't own a nice band saw yet, so I used a jigsaw with extra long blades to cut out the cathedral arch from pressure treated 4"x12"s. The balustrade uses 1"x6" cedar fence boards that I cut out also with the jigsaw, then eased the edges with a 3/16" radius bit. The ceiling and wainscot are just a mix of standard 2"x4"s, 2"x6"s and 2"x8"s. Daniel being the one with the discriminating eye for color and balance, stained the boards different colors and then we nailed them on to create a random pattern and mix of widths and colors. We were very pleased with the look and low cost of the project. It still needs a couple of coats of finish and more handrail/balustrade, but we will get to that..........some day.

Fresh Fossil


The picture shows how the "Fossil" material looks after the stone is ready to season. If you wait too long to remove the leaves, ferns, etc. They come out in small pieces and are a lot of work to remove. If you take them out too soon the impression will not be as sharp. I poured a stone at night and woke up early to remove the goodies only to find I should have removed them earlier, and ended up picking out the pieces and using a slow stream of water to soften the materials and wash away some of the excess concrete. I found some dog tracks in some of the stones, must have been an ice age coyote, going to the stream for a drink.

Sidewall Shingling


One project is under way - The Fossil Bed, and its time to start another. We're going to reside the house. The aluminum siding has got to go - It makes the place look like an old two story double wide. Sheila and I drove up to A&A Shingle Mill in Forks, Washington on July 3rd. We met Mike Allen the owner and bought 20 square of #1 shingles. We are not using his premium grade, even though he sells them at a fraction of the price lumber yards charge. We only had a budget for the #1's. They will look awesome and will be featured on future posts. Mike is a neat guy and he owned the friendliest and biggest Husky that we had ever seen. It was a beautiful drive and we were relieved that no Vampires attacked us.

Building a Fossil Bed Parking Pad


Daniel is out of school for the summer so we are officially a crew now. We decided to make a parking pad and incorporate our fascination with fossils. We started by breaking up a bunch of old concrete bags that had partially hardened with sledge hammers. After we pulverized the mix, we spread it out to make a base between three and five inches thick. We hosed this down and let it dry and harden up for a few days. Each of our fossil stones consist of two 80 lb. sacks of concrete, mixed stiff so there is no slump. We formed the stones with this mix and then laid ferns, leaves, cones, bark, flowers and whatever else we thought would make suitable fossils onto the freshly formed stone. We troweled these items down until the concrete formed a thin film over the top of them. Six to Eight hours we pulled the leaves and ferns out and waited until the next day to hose and clean the surface. Daniel used smooth, colorful stones that we picked up at the beach to make the stream bed. He is very particular about the placement, so this is his exclusive job. After the fossils are cured we will brush on a thinned down water base stain and then a coat of water based sealer. The final coat will consist of a glaze with green coloring and maybe we will add some black accents to highlight the fossils. We will publish more pictures when the job is complete. So far it is a really fun and cool project.

Never Ending Projects

I seem to never stop remodeling. There are always projects under way, beginning and seldom completed.